> For the complete documentation index, see [llms.txt](https://help.smallbuilder.com/llms.txt). Markdown versions of documentation pages are available by appending `.md` to page URLs; this page is available as [Markdown](https://help.smallbuilder.com/ko/smallbuilder-lists/undefined-1-1/datasource-setup/advanced-datasource.md).

# 고급

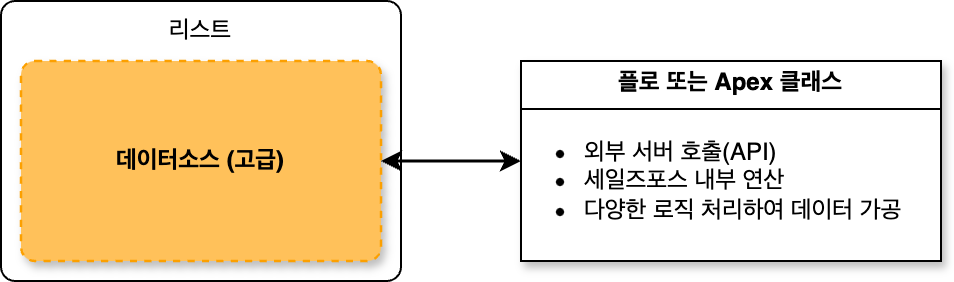
**Salesforce 외부 서버의 데이터를 조회하여 함께 표현하고자 할 때 고급 데이터 소스를 활용할 수 있습니다.** 사용자가 작성한 Apex Class 또는 플로를 통해 데이터를 가져오기 때문에, 내부 데이터 소스에 비해 더 유연하고 다양한 데이터 접근이 가능합니다. 이를 통해 Salesforce 내부 데이터와 외부 시스템의 데이터를 통합하여 LIst View에서 확인할 수 있으며, 복잡한 비즈니스 로직이나 데이터 변환도 구현할 수 있습니다.

<figure><img src="/files/7HqDAU75PaKt3wVUPXyW" alt="" width="563"><figcaption></figcaption></figure>

예를 들어 외부 서버에서 실시간 재고를 가져와 화면에 같이 표시하고 싶을 때, Apex Class에서 Rest API 코드를 작성하여 고급 데이터 소스에 지정하면 해당 데이터를 List View에 표현할 수 있습니다.

{% hint style="info" %}
데이터 소스는 다중으로 구성 및 설정이 가능합니다.
{% endhint %}

{% hint style="info" %}
Key

* 데이터 소스와 리스트 레코드 간 공통된 값으로서 데이터 소스에서 가져온 정보를 리스트와 통합하는데 사용됩니다.
  {% endhint %}

{% hint style="warning" %}
Apex Class 고급 데이터 소스 설정

Apex Class를 사용하는 고급 데이터 소스를 설정하려면 Apex Class를 먼저 작성해야 합니다. SmallBuilder Lists 패키지에서 제공하는 `SBLD.DataSourceService.Fetchable` 인터페이스를 작성하려는 Apex Class에 `implements` 하여 구현합니다.

<mark style="color:blue;">Apex Class 작성하기 ></mark>
{% endhint %}

***

### :small\_orange\_diamond: Apex Class 고급 데이터 소스 설정 방법

1\. :heavy\_plus\_sign: 버튼을 클릭하여 데이터 소스를 추가합니다.

<figure><img src="/files/Au6YxcMmDZvBZfounSYX" alt=""><figcaption><p>데이터 소스 설정 화면</p></figcaption></figure>

2\. 데이터 소스 대상 Apex Class를 검색 후 선택합니다.

<figure><img src="/files/Gkpt9fNUJmWYRwOwHick" alt=""><figcaption><p>Apex Class 검색</p></figcaption></figure>

3\. 활성화 여부, 설명(Description), Key 필드(Key Field), 파라미터(Parameters)를 설정합니다.

<figure><img src="/files/WnbInVRvXa4uwXOD3A5C" alt=""><figcaption><p>Apex Class 데이터 소스 설정</p></figcaption></figure>

<table><thead><tr><th width="96">번호</th><th width="147">필드명 및 영역</th><th width="401">설명</th><th>필수</th></tr></thead><tbody><tr><td>1</td><td>활성화</td><td>데이터 소스를 활성화합니다. 활성화가 되어 있지 않으면 리스트 구성 시 작동되지 않습니다.</td><td></td></tr><tr><td>2</td><td>설명<br>(Description)</td><td>데이터 소스에 대한 설명을 기입합니다.</td><td></td></tr><tr><td>3</td><td>Key 필드<br>(Key Field)</td><td>Apex Class에 설정된 key 값과 공통된 값을 가진 리스트 지정 개체의 필드를 설정합니다.</td><td><mark style="color:red;">✔️</mark></td></tr><tr><td>4</td><td>파라미터<br>(Parameters)</td><td>Apex Class에서 리스트 지정 개체의 필드 값이 필요한 경우, 해당 필드를 선택하여 Apex Class로 전달합니다.</td><td><mark style="color:red;">✔️</mark></td></tr></tbody></table>

***

### :small\_orange\_diamond: 플로 고급 데이터 소스 설정 방법

1\. :heavy\_plus\_sign: 버튼을 클릭하여 데이터 소스를 추가합니다.

<figure><img src="/files/Au6YxcMmDZvBZfounSYX" alt=""><figcaption><p>데이터 소스 설정 화면</p></figcaption></figure>

2\. 데이터 소스 대상 플로를 검색 후 선택합니다.

<figure><img src="/files/nUiVi2Wou2bcTXLP1ZJu" alt=""><figcaption><p>플로 검색</p></figcaption></figure>

3\. 활성화 여부, 설명(Description), Key 필드(Key Field), 파라미터(Parameters)를 설정합니다.

<figure><img src="/files/66Qx6lm9JnuvcxVUdw69" alt=""><figcaption><p>플로 데이터 소스 설정</p></figcaption></figure>

<table><thead><tr><th width="92">번호</th><th width="163">필드명 및 영역</th><th width="385">설명</th><th>필수</th></tr></thead><tbody><tr><td>1</td><td>활성화</td><td>데이터소스를 활성화합니다. 활성화가 되어 있지 않으면 리스트 구성 시 작동되지 않습니다.</td><td></td></tr><tr><td>2</td><td>설명<br>(Description)</td><td>데이터 소스에 대한 설명을 기입합니다.</td><td></td></tr><tr><td>3</td><td>입력 변수<br>(Input Variable)</td><td>플로로 지정된 경우 플로에 전달할 파라미터 변수를 선택합니다. 파라미터가 필요 없는 경우 선택하지 않습니다.<br>💡 옵션에서 보여지는 값들은 지정된 플로에 있는 리소스(Available for input)입니다.<br><img src="/files/keUSl5nKubbz1pP25Ogf" alt=""></td><td><mark style="color:red;">✔️</mark></td></tr><tr><td>4</td><td>출력 변수<br>(Output Variable)</td><td>플로 결과 값을 가져올 변수를 선택합니다.<br>💡 옵션에서 보여지는 값들은 지정된 플로에 있는 리소스(Available for output)입니다.<br><img src="/files/kN7muuWhPYUOh8fim8ZK" alt=""></td><td><mark style="color:red;">✔️</mark></td></tr><tr><td>5</td><td>Key 필드<br>(Key Field)</td><td>출력 변수의 필드와 공통된 값을 가진 리스트 지정 개체의 필드를 설정합니다.</td><td><mark style="color:red;">✔️</mark></td></tr></tbody></table>
